
Text may contain bad spelling, incorrect expressions, verbal turns, sentence constructions, etc.
Introduction: About KoboldCPP & SillyTavern, LM Studio
KoboldCPP is a user-friendly tool for running text generation models in GGML and GGUF formats, built on top of llama.cpp.
llama.cpp is written purely in C/C++ and has no external dependencies, which allows it to run with high performance.
KoboldCPP is especially useful for running local LLMs on systems with limited VRAM, as it can utilize the CPU instead of relying solely on the GPU.
While KoboldCPP may be slower than other backends that load models exclusively into VRAM, it makes it possible to run large LLMs on less powerful machines.
KoboldCPP includes its own interface (UI), but it’s not as flexible, feature-rich, or (in the author’s opinion) as comfortable to use as SillyTavern.
SillyTavern is a UI designed for interacting with text generation models via API (KoboldAI/CPP, OpenAI, OpenRouter, and others).
It integrates with in-chat image generation tools like WebUI from A1111 and ComfyUI, and also supports TTS. It can work either as a standalone system (non-AI) or generate voice using AI through APIs.
SillyTavern features a highly customizable interface, includes powerful tools like lorebooks (lorebook and world info), supports automatic message translation via Google, DeepL, and other services, and offers a wide range of community-created extensions and add-ons.
KoboldCPP + SillyTavern is a versatile, flexible setup that’s suitable for just about anything – including immersive RP.
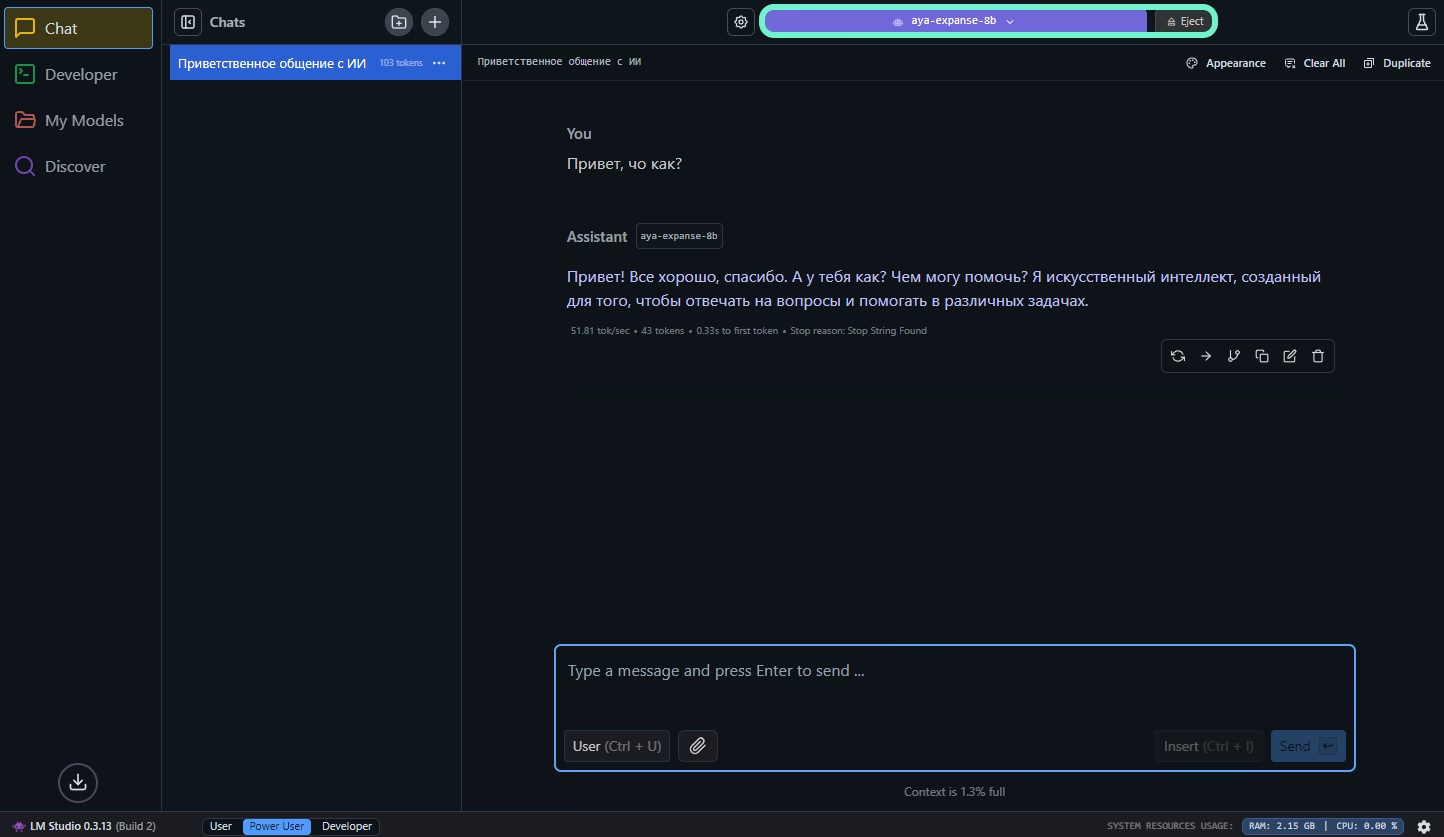
LM Studio is an incredibly simple and user-friendly tool – install it, launch it, and you’re good to go.
It comes with built-in support for models with “reasoning” capabilities, no setup required.
LM Studio is great for testing models and handling both technical and general tasks like coding, answering questions, writing, rewriting, and more.
As a backend, LM Studio is less flexible than KoboldCPP. And as a frontend, it’s not as customizable as SillyTavern – but it’s minimalist and pleasant to use.
Installing Git (Bash), NodeJS and Python
NodeJS
Windows
For Windows, download the installer for your system architecture.
I recommend using the LTS version.
Run the installer, click “Next” through the steps, uncheck the box at the end that says “Automatically install the necessary tools…”, and complete the installation.
Linux
On Linux, you can install NodeJS using Volta or any other method you prefer.
Installing Volta:
| |
Installing NodeJS and NPM:
| |
Where “x” is the major version of Node you want to install, which you can check on the NodeJS homepage.
For example, Node.js LTS v22.14.0:
| |
Git
Windows
For Windows, you need to download Git, either the “Standalone” installer or the “Portable” version. I recommend the portable version, but you’ll have to update your environment variables manually – more on that later.
Linux
If you’re a Linux user, Git is probably already installed. You can check by running git -v. If it’s not installed:
Debian:
| |
Arch:
| |
Python
To run the “unpacked” version of KoboldCPP, Python is required.
I recommend installing Python and using the “unpacked” KoboldCPP – this will improve performance.
More details on this will come later.
Windows
For Windows, you need to download and install Python.
Download the «Windows Installer» for the Python version you want from the «Stable Releases» column. If you don’t need a specific version, just get the latest one.
During the installation, click «Customize installation» and check the boxes for «pip», «tcl/tk», and «Add Python to environment variables»:
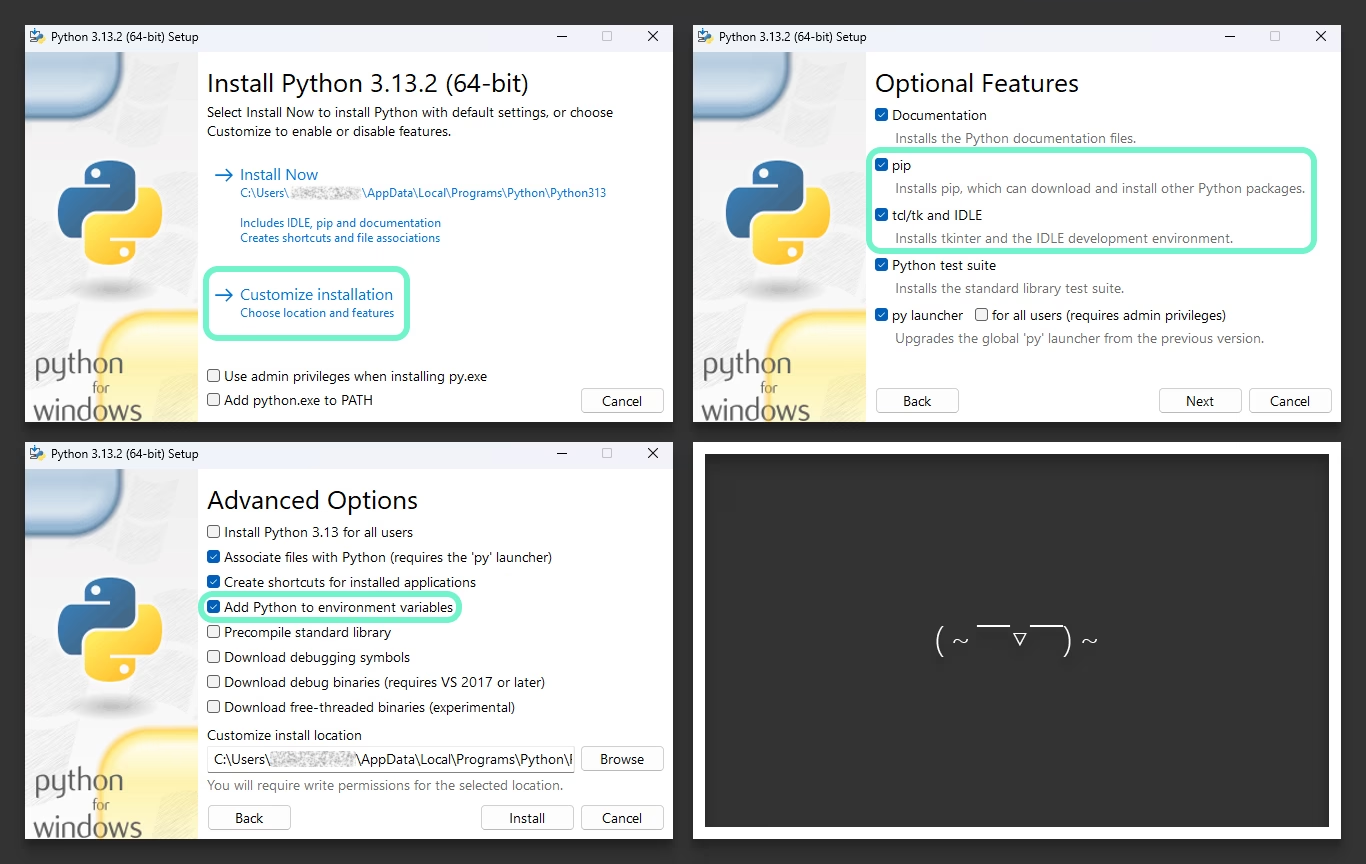
You can choose the installation location as you prefer.
Linux
Just like with Git, Python is usually already installed on Linux distros, but it might be an older version. You can check by running:
| |
Python 2 is an old version. If you don’t have Python installed, or the version is outdated, then:
Debian:
| |
Arch:
| |
Setting up environment variables
After installing Git, NodeJS, and Python, you may need to add them to your environment variables. This lets you run them without specifying the full path to their binaries. Programs will also be able to use simple commands like python, node, and git.
Usually, the Python and NodeJS installers update the environment variables automatically – unless you disabled that option. The same goes for Git if you installed it via the installer instead of using the portable version.
Windows
- Win + R
systempropertiesadvanced- Environment Variables
- User variables
- Path
- New
- Git:
path\to\git\bin\andpath\to\git\cmd\ - NodeJS:
path\to\nodejs\ - Python:
path\to\python\andpath\to\python\Scripts\
One line – one path!
Linux
If you installed Git and Python through a package manager (apt, pacman, etc.) or they were already on your system, and NodeJS was installed via the official site (including through Volta), everything should be fine.
But if that’s not the case:
Open .bashrc in the nano editor:
| |
At the end of the file add:
| |
Update .bashrc:
| |
Usually the paths are:
- Git:
/usr/bin/git - NodeJS:
/usr/bin/node - Python:
/usr/bin/pythonor/usr/bin/python3
But they might be different.
You can try running this command to find out where the program is located:
| |
Example of .bashrc:
| |
Check
Type the following in the terminal:
| |
If you get the version number instead of an error like this:
| |
| |
That means everything is working.
Installing and Running KoboldCPP + SillyTavern & LM Studio
To start, I recommend thinking about your directories where to put what and set up something like this:
| |
KoboldCPP
Go to the releases page on the GitHub KoboldCPP repository.
Download the binary for your system, choosing based on the release notes.
Run the binary file:
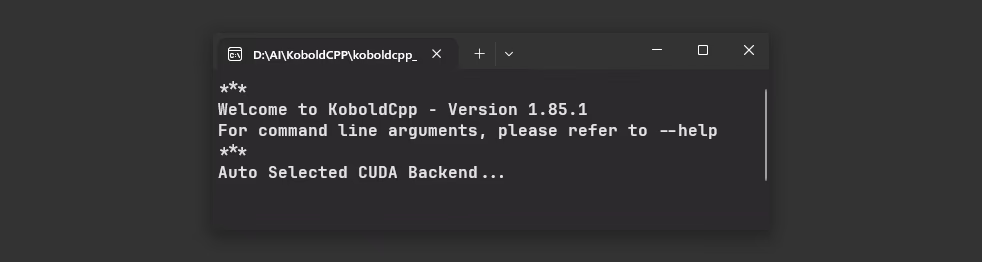
The startup isn’t fast because these are packed Python files (code), the Python interpreter, and other files bundled into one.
You can also interact with the binary through the terminal, for example:
| |
To unpack KoboldCPP, go to «Extra» => «Unpack KoboldCpp To Folder» and choose an empty directory to extract to.
Now you can run KoboldCPP much faster using Python:
| |
However, in this case the GUI won’t work, GUI only works when running the binary file.
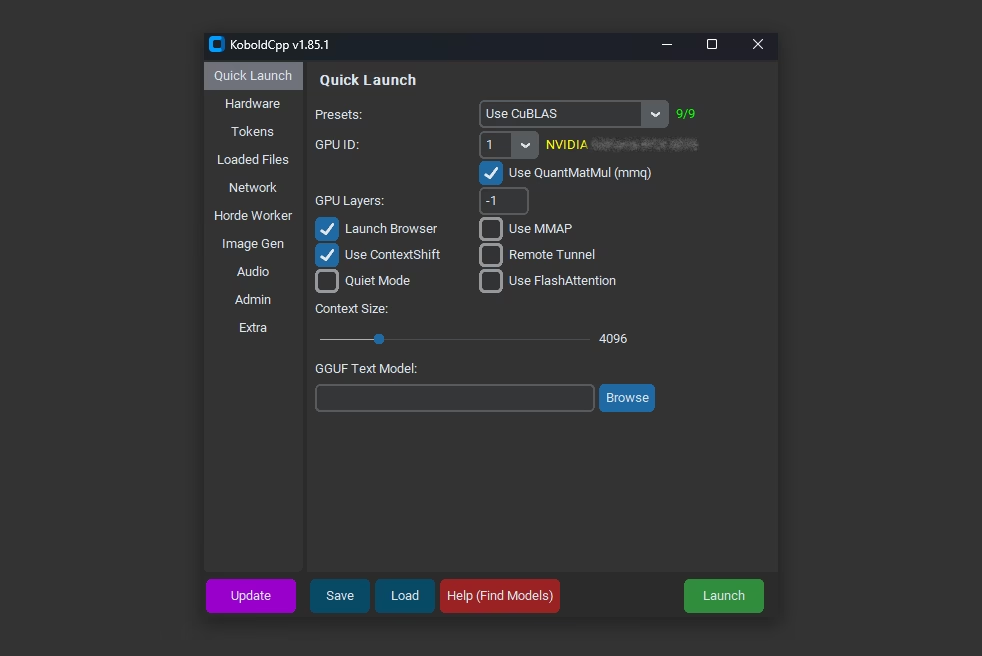
If you don’t want to deal with the terminal and typing lots of flags, there’s an option to configure everything through the GUI.
Start the binary file and set up everything via the GUI, then save the config (click the «Save» button).
After that, you can use this command:
| |
This will launch KoboldCPP using the previously created config.
If you need to edit the config, you can do it the same way through the GUI (by loading it with the «Load» button, making changes, and then saving), or simply open the config file in a text editor to swap models or change the context size.
SillyTavern
Download the source code manually from the GitHub repository or use git:
| |
This command clones the repository into a folder named “SillyTavern” in the same directory where the command was run.
Running on Windows:
Double-click «Start.bat» or run in the terminal:
| |
Running on Linux:
Make the file executable:
| |
Run:
| |
Base settings
Open the «API Connections» tab (at the top):
- API: Text Completion
- API Type: KoboldCpp
- API URL: KoboldCPP API URL
You can find the «API URL» in the terminal after starting KoboldCPP, but usually it’s :5001 if that port was free.
I highly recommend enabling «Derive context size from backend» so that the «Context (tokens)» value is automatically fetched from the backend – meaning from the KoboldCPP setting where you set the context size.
«Auto-connect to Last Server» is also a useful option. It lets SillyTavern connect automatically to the last backend server on startup, so you don’t have to tap «Connect» manually every time.
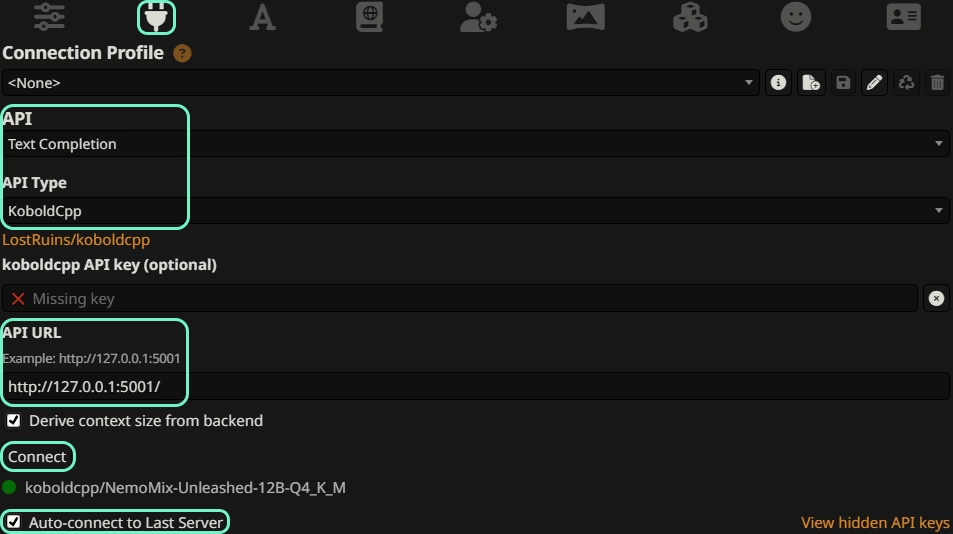
Tap «Connect», and if you see 🟢 and the model name, that means everything is working.
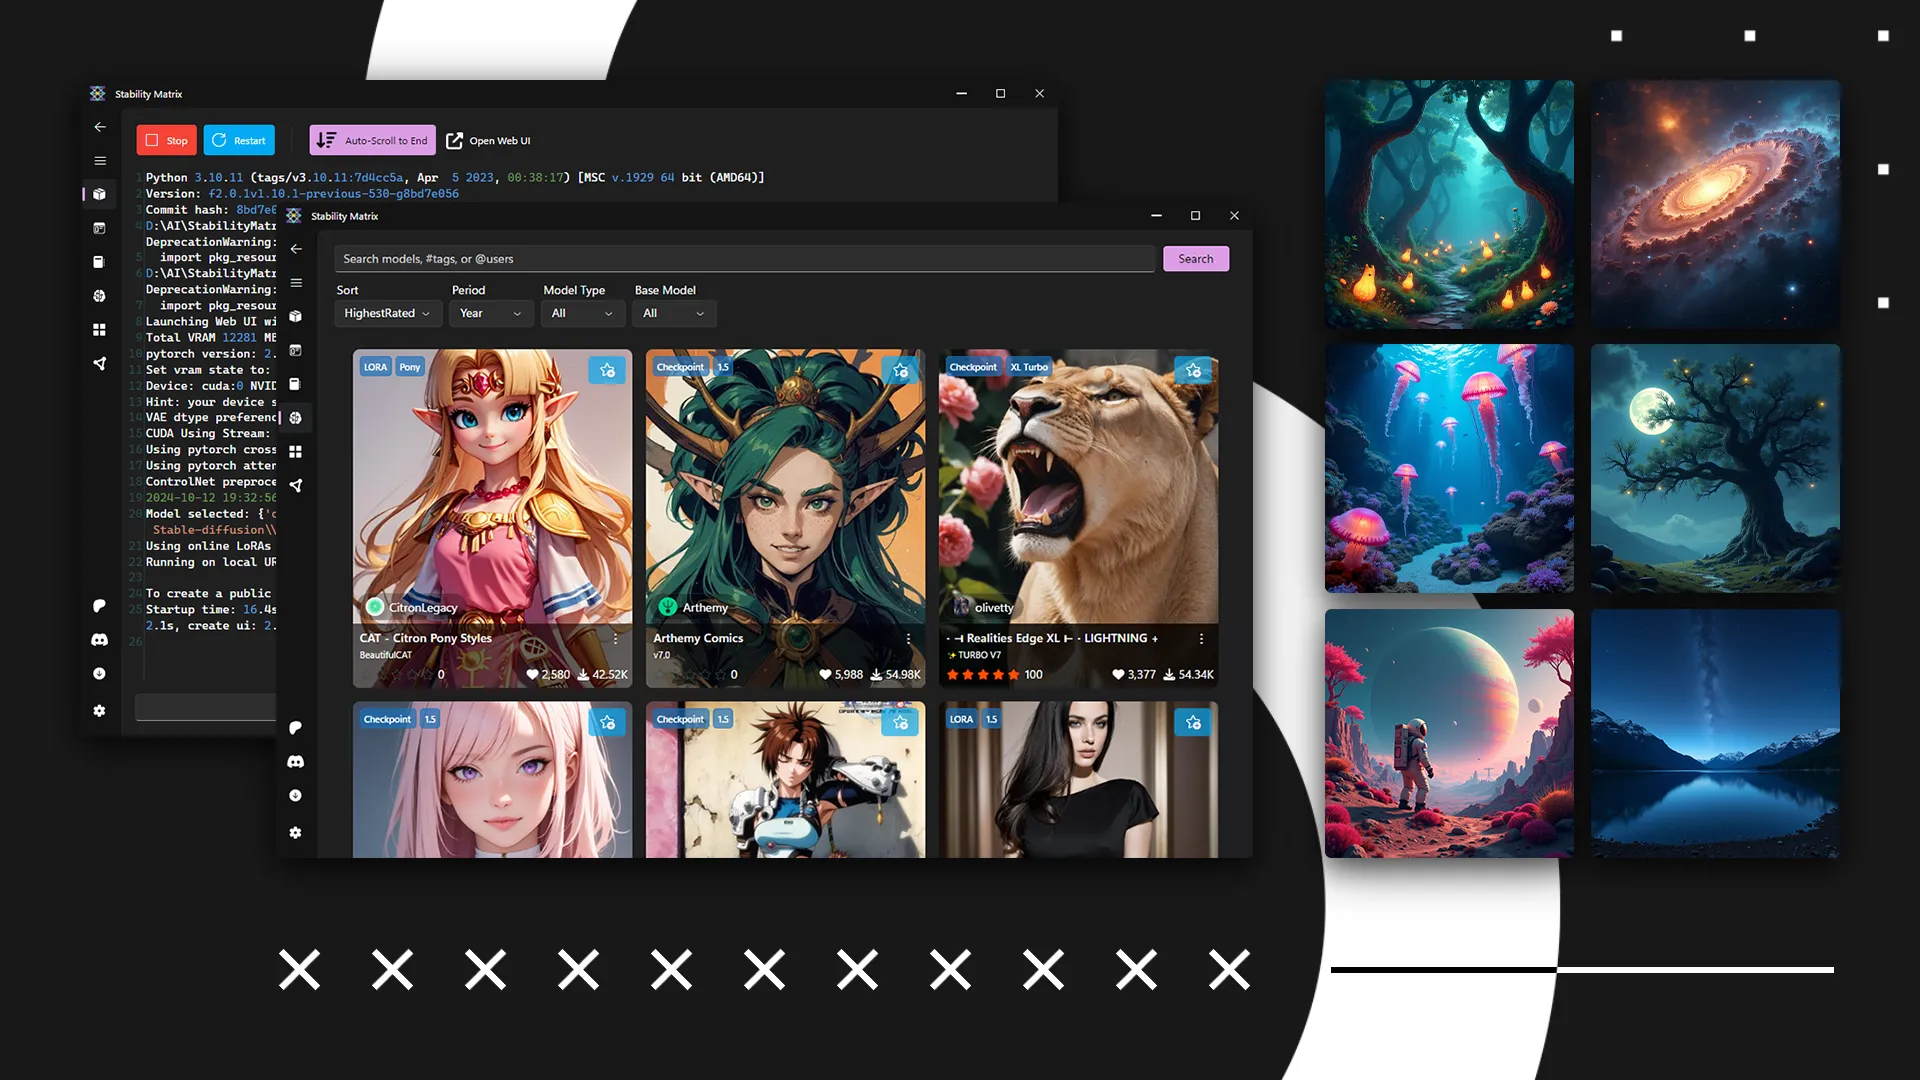
LM Studio
Go to the LM Studio website, select your OS and architecture, then download and install it.
Now, go to the settings:
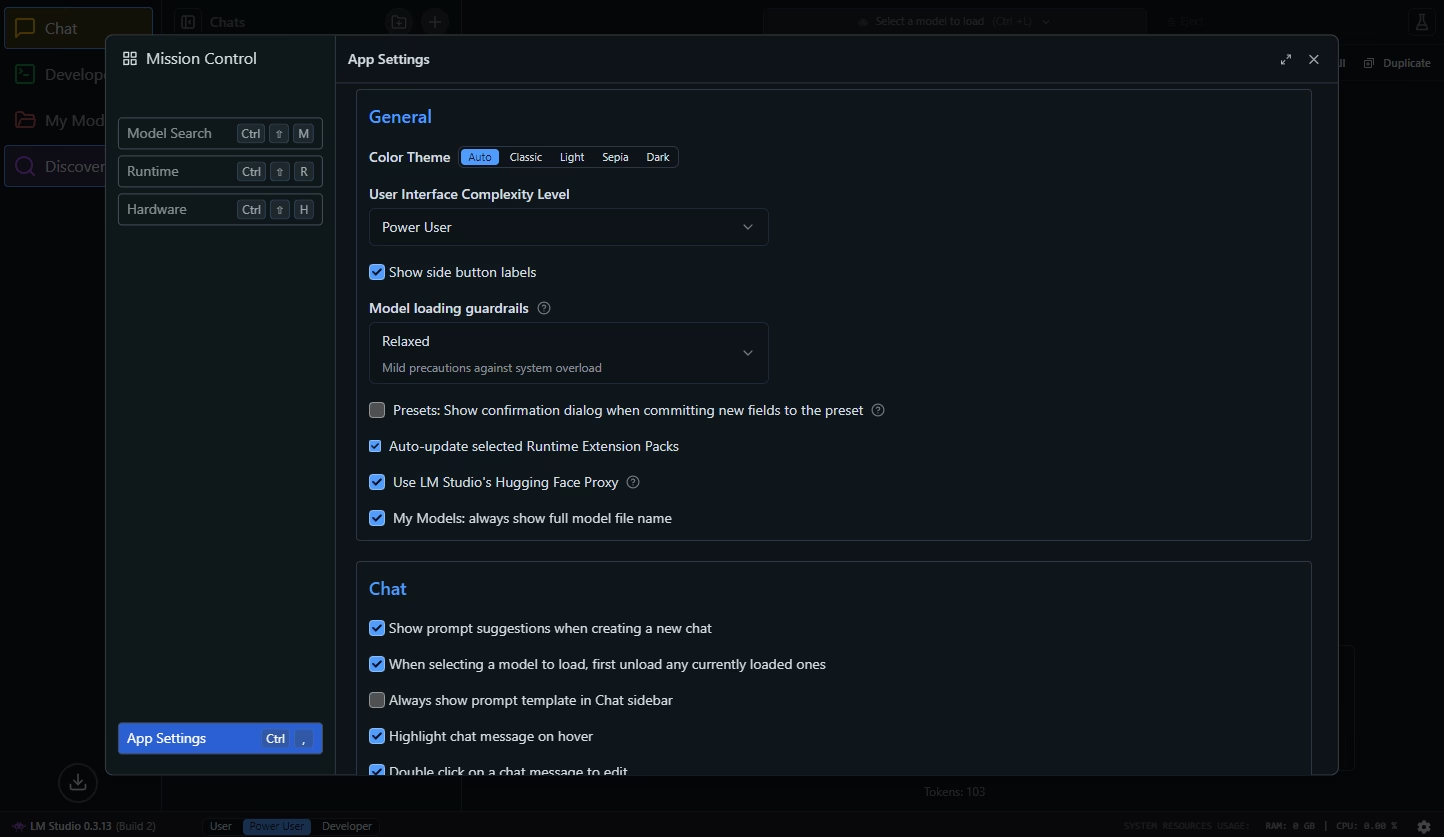
- «User Interface Complexity Level» - set to «Power User»
- «Show side button labels» - enable (for clarity)
- «Model loading guardrails» - your choice, I personally use «Relaxed»
- «Use LM Studio’s Hugging Face Proxy» - helps with accessing HF through LM Studio if a direct connection doesn’t work
- Other settings are up to you
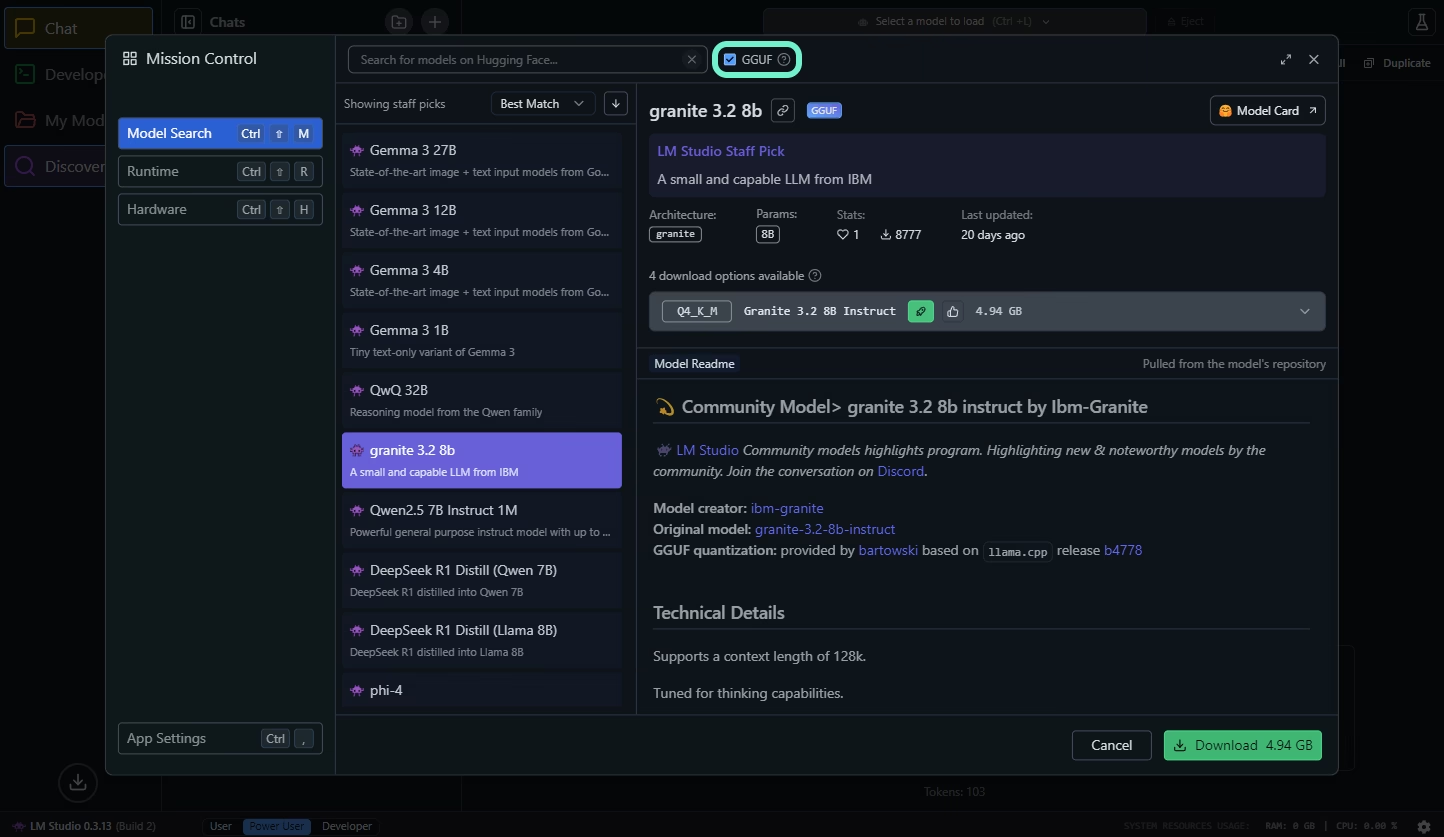
Tap «Discover» in the sidebar:
Go to «Runtime»:
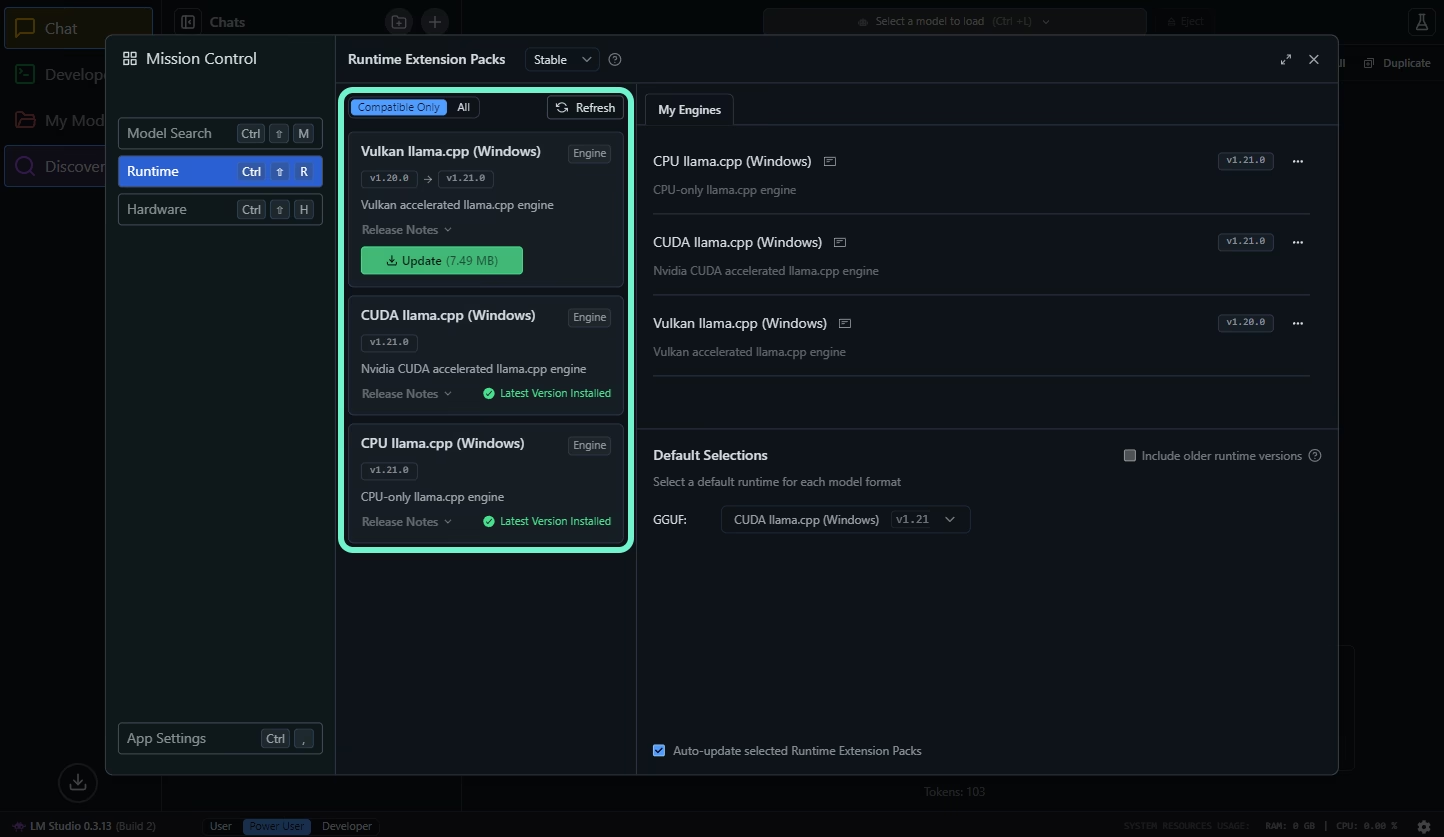
Update «CPU llama.cpp», and the second CUDA package for Nvidia GPUs. For AMD GPUs, use Vulkan or ROCm.
On the «My Models» page (in the sidebar), you can view and adjust default settings for each model.
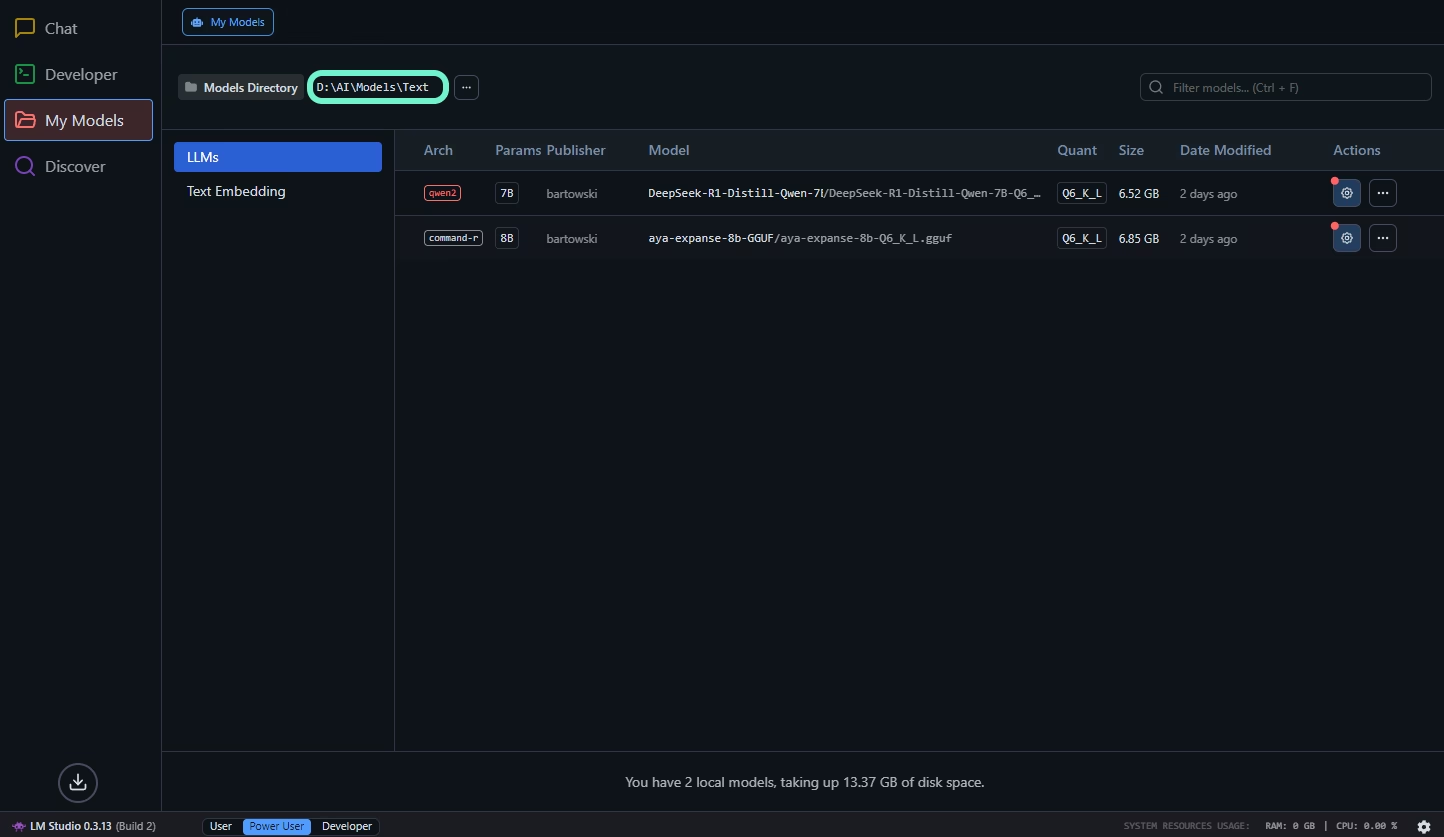
If you download models manually instead of through LM Studio, they should be placed like this:
| |
dir1 and dir2 don’t have to be named after the author or model, the main thing is to keep this hierarchy, otherwise LM Studio won’t recognize them.
Models load and unload from the top:
Tips for KoboldCPP & SillyTavern
KoboldCPP
CuBLAS usually runs faster than CLBlast for Nvidia GPUs.
For AMD GPUs, you should use Vulkan, or even better, ROCm.
Using «MMQ», «MMAP», «MLOCK», «ContextShift», «FastForwarding», and «FlashAttention» might help speed up generation – this is best determined through experimentation.
Explanation: MMQ, MMAP, MLOCK, ContextShift, FastForwarding, FlashAttention
MMQ (Quantized Matrix Multiplication)
MMQ mode uses quantized matrix multiplications for prompt processing instead of the standard cuBLAS operations. This saves VRAM and can boost performance for some quantized formats (like Q4_0), though the effect might be less noticeable for other formats.
Imagine you have two ways to do matrix calculations when generating a new token in a language model. One uses the standard cuBLAS algorithm, which already supports low precision, and the other is MMQ mode, optimized specifically for quantized data. When MMQ is enabled, the system picks the optimized algorithm for prompt processing, allowing faster request handling and reduced VRAM usage if the model is quantized at the right level. This doesn’t mean cuBLAS stops being used–MMQ operates within the cuBLAS framework but changes how data is processed for certain quantized formats.
MMAP (Memory Mapping)
MMAP is a way of handling model weights and layers where they’re loaded into RAM only partially. The system loads needed parts on demand.
When running an LLM, MMAP lets the model appear as if it’s fully loaded into RAM, but in reality, only the blocks required for the current request are read.
MLOCK (Memory Lock)
MLOCK forces the operating system to “lock” the loaded model data in RAM, preventing it from being swapped out to disk. This avoids delays caused by accessing slower virtual memory.
For LLMs, it’s important that key model weights stay in fast memory (VRAM or RAM). MLOCK pins data in RAM if part of the model is loaded there, preventing swapping and reducing latency.
Swapping is moving processes or parts of them from RAM to disk (swap file).
ContextShift
ContextShift allows efficient handling of large context windows. Instead of recalculating the entire context, the system “shifts” the KV cache–old data is discarded, and new data is moved to the start of the new window.
For example, if a chatbot is in a long conversation, when generating a new response, the model doesn’t start processing the entire context from scratch. Instead of recomputing everything, it keeps intermediate computed representations (hidden states) of the processed messages. When generating the new reply, the model uses these saved states to quickly incorporate the latest messages. This is like incremental generation in transformers, where the model continues calculations based on what’s already been processed.
This approach speeds up processing significantly, since the model focuses only on the new information.
FastForwarding (KV-caching)
FastForwarding lets the model skip reprocessing tokens for which hidden states (KV cache) have already been computed, generating new tokens only for changes in the sequence. This feature is especially useful when using «ContextShift».
Think of incremental generation in transformers: when generating a new token, the model doesn’t fully recalculate all previous tokens but uses the saved KV cache for the already processed parts. FastForwarding in KoboldCPP works similarly – if the model continues generating text in a long conversation or document, it “fast-forwards” through the already computed sections and updates only the latest, changed parts of the sequence, which significantly speeds up processing.
For example, if there’s a history of 1000 tokens, FastForwarding creates a KV cache of those 1000 tokens in one pass, and on the next generation, it uses this cache instead of recalculating everything from scratch.
FlashAttention
FlashAttention uses more efficient data handling and GPU cache usage, which speeds up computations and reduces VRAM consumption.
In transformer models, attention calculations usually require a quadratic amount of operations as sequence length grows. FlashAttention optimizes this process, enabling faster processing of long sequences, which is especially important for high-load AI server applications.
Context also requires VRAM–and quite a bit of it–so you shouldn’t load all your VRAM just with model layers if you’re using a large context of 8-12K+ tokens.
Try to fit as many layers as possible into VRAM while leaving enough space for the context. If even one layer doesn’t fit fully in VRAM, it’s better to leave more than one layer unloaded–like 2-3 layers.
If your VRAM isn’t enough to load most layers, switch to lighter quantization formats. If Q6 doesn’t fit, use Q5. If Q5 doesn’t fit, go for Q4.
This will reduce generation quality, but it will work. If accuracy and quality are critical, running locally might not be the best option if your hardware is insufficient.
As a last resort, if you have a lot of RAM, you can significantly sacrifice speed by loading more layers into RAM than VRAM.
Check the generation speed with «BLAS Batch Size» set to 512, then set it to 2048 and check again. If 2048 is slower than 512, maybe 1024 will work better.
Ideally, the bigger the «BLAS Batch Size», the better, but too large a value can actually slow down generation speed.
Regarding «Threads», the value “-1” means “auto.”
If you don’t manually set a value for each «Threads» parameter, it will inherit the value from the main «Threads» setting.
For example: you have 6 cores, 12 threads, if you set «Threads» to 12 but leave «BLAS threads» unset, then «BLAS threads» will also use 12 threads. In total, that would be 24 threads used, while you only have 12 available–and the OS also needs resources.
Usually, KoboldCPP sets the optimal number of threads automatically, but it’s worth checking which values are assigned by default to ensure everything is okay. You can see this next to the «Threads» parameter (after the model starts) via the GUI or in the terminal logs.
If your system runs slowly or unstably, try lowering the number of threads manually.
Make sure KoboldCPP does not use more threads than you physically have, and that the system keeps some free resources (2-4+ threads) for itself.
To change the model, you need to restart KoboldCPP.
SillyTavern
I couldn’t find a complete guide on YouTube that explains all the SillyTavern settings in one place.
So, if you decide to stick around, you’ll have to experiment and do a lot of googling… And if you’re a total beginner, you’ll be googling even more.
Here are your two new best friends – SillyTavern Documentation & r/SillyTavernAI, where you might find the info you need.
Models are not created in the GGUF format, GGUF is a format for storing the model’s quantizations. So, wherever you download a GGUF model (often from HF), there should be a link to the “original” or instructions provided.
On the original page, you can usually find not only the model description but also settings, and in some cases, even presets for ST1.
For example, the model I’m using at the time of writing this article is «NemoMix Unleashed 12B» (GGUF).
Everything is described there, with settings and ST presets provided.
Actually, having the perfect settings isn’t mandatory. But the right settings for the «Context Template» (very important), «Instruct Template» (if available), «System Prompt» (less important), and sampler settings for fine-tuning output can VERY significantly improve generation quality.
Conclusion
KoboldCPP combined with SillyTavern is a powerful tool for enthusiasts who value flexibility, customization, and detailed tweaking. It’s the perfect choice for experiments and RP. However, because of the many parameters and fine settings, it can take some time to get used to.
LM Studio, offers simplicity and ease of use. It’s a great option for those who want to start using local models right away with minimal setup. If your goal is to generate text, code, or answers without needing fine-tuning, LM Studio is the optimal choice.
Read too:

ST - short for SillyTavern. ↩︎